

This guide will walk you through everything you need to build a visual automation project using a Raspberry Pi (RPi) using Groundlight's Computer Vision (CV) service that combines the best of modern AI with live human oversight. This document will help you understand why the Raspberry Pi is a great choice for CV and visual automation projects, provide some practical examples for inspiration, and get you on your way to improving your physical world with AI.
If you're new to Groundlight's computer vision software entirely, be sure to check out our first tutorial on using Groundlight's Python SDK, which will help you with this guide.
To see a similar tutorial of Robotics Engineer Tim running Groundlight's computer vision software on a Raspberry Pi to create a parking detector, check out this video:
What's below
- Why Run a Computer Vision Application on a Raspberry Pi
- Getting the Hardware: A list of required hardware components
- Installing the OS & Libraries: Step-by-step instructions to set up the operating system and necessary libraries
- Setting up your Code: Guidance on writing and deploying your CV code
- Maintenance of your Detector: Tips for maintaining and updating your CV system
Why run a computer vision application on a Raspberry Pi?
The Raspberry Pi is a cost-effective, compact, and energy-efficient device, making it ideal for deploying computer vision applications in various environments. Unlike a laptop, the RPi can be easily integrated into embedded systems, used in remote locations, and run continuously with minimal power consumption.
While laptops are powerful and convenient for development, they are not always suitable for deployment in the field. The RPi offers a more flexible and scalable solution for long-term projects, especially where space, power, and cost are critical factors.
Examples of computer vision Solutions on a Raspberry Pi
Anything you'd like an automated system to "keep an eye on" for you, and visually monitor, can be done here.
- Home Automation: Monitor your home to control home appliances or support social contracts.
- Security Systems: Implement real-time surveillance and alert systems.
- Industrial Automation: Automate quality control processes in manufacturing.
- Environmental Monitoring: Track wildlife or monitor environmental changes.
- Pet Monitoring: Keep an eye on your pets. Try automated training.
- Packages and Deliveries: Track packages and deliveries. Alert you if a squirrel is eating your groceries!
Because Groundlight's service combines traditional computer vision with live human monitoring, it can start working on the first day from just simple instructions, and will get better and faster over time.
Getting the hardware
One of the first things you'll need is a Raspberry Pi computer. Which one? The newer, more powerful Raspberry Pi 4 or 5 will be easier to work with, but cost more and are larger than the Raspberry Zero 2.
Overview of which Raspberry Pis we DO recommend:
- Raspberry Pi 4: We recommend the Raspberry Pi 4 with 4GB of RAM. This gives you plenty of power to support any of the applications described here, and are relatively easy to find and affordable.
- Raspberry Pi 5: Also a great choice. More expensive. Also can be harder to find in-stock. But definitely the fastest most-powerful option today.
- Raspberry Pi Zero V2: This smaller, more affordable model has advantages, but its small amount of RAM prevents it from supporting certain tools like a desktop or VS Code. If you do use a Pi Zero, we recommend increasing the swap space to 2GB, which will reduce crashes, but won't help it run any faster.
Which one we do NOT recommend:
- Raspberry Pi Zero (original): The original Raspberry Pi Zero only runs 32-bit OS images, and is increasingly difficult to get modern software to run on. We currently don't publish a 32-bit OS image because of incompatibilities with some key libraries. You can get it to work, but due to numerous complexities, we don't recommend it.
Other hardware:
- Camera: Any USB Webcam or Raspberry Pi camera will work. Or a network IP camera that uses RTSP. Think about how you're going to mount and aim the camera - often you can pay more for the plastic and screws to point it in the right direction than the camera itself. And if you need it to be outside, a network RTSP camera is the easiest way to get a waterproof solution.
- Case: You'll want a case for your Pi - there are many great options for sale, or designs you can 3D print yourself.
- HDMI Adapter: To connect a monitor to your Pi you'll probably need an HDMI adapter: "Micro HDMI" for Pi 4 or 5, and "Mini HDMI" for Pi Zero.
- Power supply: Pi's just use standard USB power. You probably have an extra USB power supply lying around that will work. The best thing about buying one specifically for RPi is they often come with power switches. If they don't include a power switch, don't bother.
- Full Kit: There's a lot of choices up there - to keep things simple, you can just buy a full kit with all the parts.
This equipment can be purchased from Amazon or Adafruit. If you have trouble finding it in stock, check RPi Locator. With these components, you will be well-equipped to set up and deploy your computer vision application on a Raspberry Pi.
Groundlight Hub: A professional, fully-managed “no coding required” alternative
If the DIY aspect of this all sounds complicated, and you'd prefer to pay for something that just works then the Groundlight Hub is probably the way to go. It's a heavy-duty industrial-quality compute module that can run any Groundlight application for you. The hardware is designed to operate in the toughest environments reliably for years. Plus it's fully supported by Groundlight 24x7 to ensure it never goes down, and always performs its best.
Installing the OS & libraries
Groundlight provides Linux images for Raspberry Pi, pre-loaded with all the software required to build a computer vision application. These installable images are located in the releases section of the groundlight-pi-gen Github repository. There, you will find Raspberry Pi OS images (.img.xz files) that have pre-configured software environments for running computer vision applications with Groundlight. These images are ready to be flashed onto a Raspberry Pi.
The images include Python 3.11, along with key libraries like OpenCV for classic algorithms and device management, Numpy for fast math, FrameGrab for declarative access to image sources, and Groundlight for fully-managed visual understanding models. The images also automatically set up a python venv for managing python libraries. You can of course add this stuff to any standard Ubuntu or Rasbian image, but it can be surprisingly difficult to get all these libraries working properly, so we have taken care of this for you.
There are several OS image options available. The smaller ones are suitable for headless use, while the larger ones include a desktop GUI with a browser. The available flavors in the current release are:
- sdk-only: Minimal image with the Python SDK and core libraries. Suitable for headless use on smaller Raspberry Pi models such as the Pi Zero 2, or if you just want something slim and fast.
- desktop: Image with Groundlight, and a desktop GUI with a browser. Appropriate for a Raspberry Pi with a screen attached.
Note that we currently only publish a 64 bit image. 64 bit images are compatible with the 3B, 3B+, 3A+, 4B, 400, 5, CM3, CM3+, CM4, CM4S, and Zero 2 W Raspberry Pi models. However, on the Zero 2 W model there is very limited RAM available, so with a 64 bit image it will not support running VS Code and certain other tools.
Once you have downloaded an image file, the next step is to flash it onto a microSD card. To do this, download the Raspberry Pi Imager software.

After selecting your hardware type under "Choose Device", click "Choose OS" and scroll to the bottom to "Use custom".
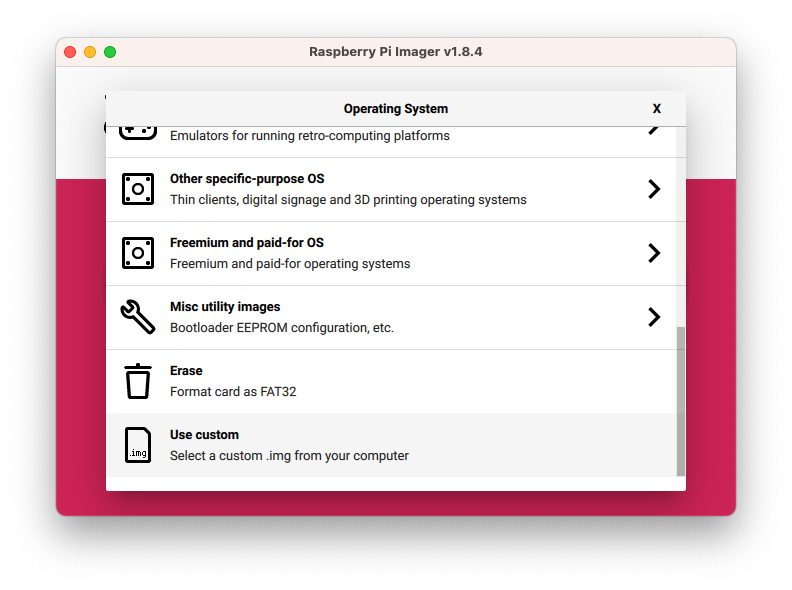
Then select the .img.xz file you downloaded.
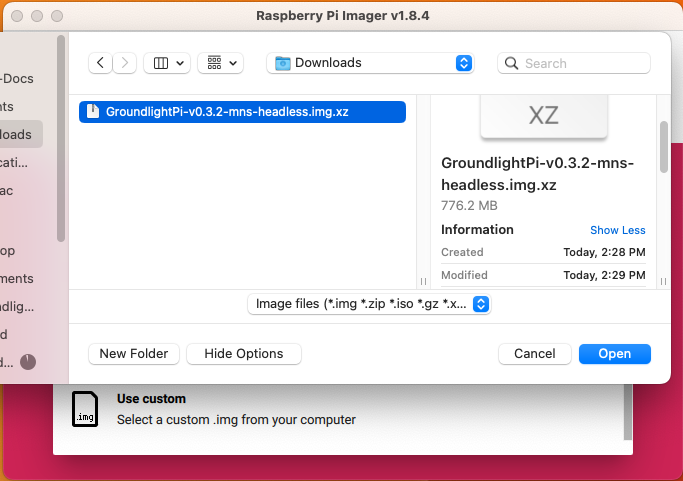
Select your microSD card with the "Choose Storage" button, and then click "Next".
You'll get a prompt asking "Use OS customization?" which is optional, recommended. Choose "Edit settings", and you can set your username and password, Wi-Fi credentials, and enable SSH login with a public key.
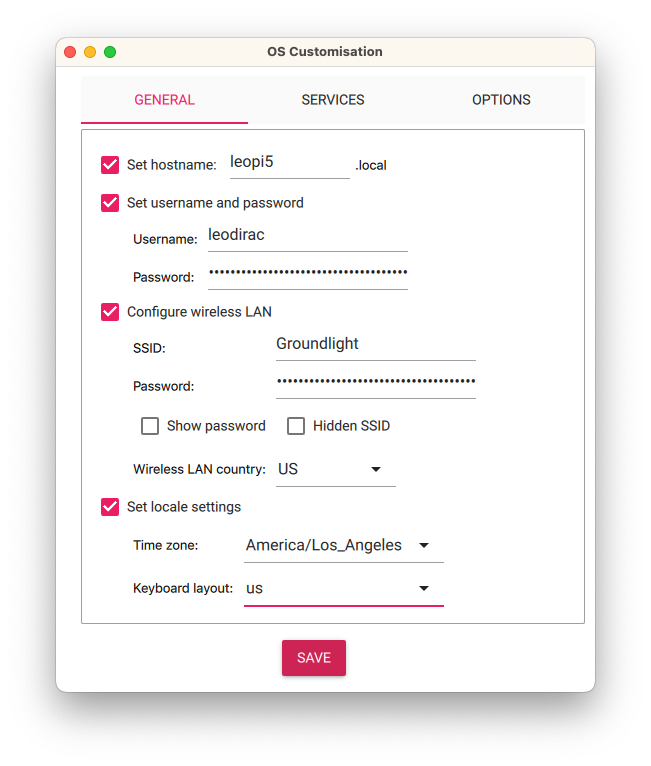
When you're done configuring settings, click "Save" and then "Yes" to confirm. Writing the image to the microSD card will take a few minutes. When it's done, insert the micro SD card into your pi, and power it on. Then, after waiting a few minutes for it to boot, you can access your Raspberry Pi over the network or through physically connected devices. The Raspberry Pi is now set up and ready to use.
Setting up your code
The easiest way to set up your application is to start by cloning an existing Github repo that uses Groundlight. Here are a few examples:
- Garden Watcher: play a "dog barking" sound when an animal is in your garden
- Domestic Tranquility: help keep your kitchen clean by thanking people when they clean up
- Parking spot monitoring app in github
Or if you'd like to build something from scratch, we recommend you watch Tim's excellent video: a complete 18-minute tutorial on building applications for Groundlight's SDK. Note that this video assumes you have a fairly powerful computer - like a laptop, or a Raspberry Pi 4 or 5. We've found that Raspberry Pi Zero's struggle (read: crash) when using fancy modern editors like Visual Studio Code. We recommend installing the desktop version of the OS if you're going to follow this guide.
Our documentation at https://code.groundlight.ai is an excellent resource as well.
Maintenance of your detector
Once your detector is configured, visit https://dashboard.groundlight.ai to monitor its performance. You will see the latest images posted to the detector, and have an opportunity to provide Ground Truth labels needed to measure accuracy. (Without Ground Truth we can't know how well we're matching your intent, because natural language instructions are always ambiguous.)
Whenever your existing instructions are unclear, you will be prompted to improve the instructions by disambiguating edge cases, and labeling "Ground Truth" to guide both the ML process and the live cloud labelers.